phpMyAdmin is a free software tool written in PHP that is intended to handle the administration of a MySQL or MariaDB database server. You can use phpMyAdmin to perform most administration tasks, including creating a database, running queries, and adding user accounts.
Install and configure PHPMyAdmin on ubuntu 22.04; Through this tutorial, we will show you how to install and configure PHPMyadmin in ubuntu 22.04 system.
How to Install phpMyAdmin in Ubuntu 22.04
Steps to install and configure phpMyAdmin in ubuntu 22.04 system using terminal or command line:
- Step 1 – Update System Dependencies
- Step 2 – Install PhpMyAdmin Ubuntu 22.04
- Step 3 – Configure PHPMyAdmin
- Step 4 – Restart Apache 2 Server
- Step 5 – Access phpMyAdmin
- Step 6 – Secure phpMyAdmin Optional
Step 1 – Update System Dependencies
Open a terminal or SSH into your server and update the package list to ensure you have the latest information about available packages:
sudo apt update
sudo apt upgrade
Step 2 – Install PhpMyAdmin Ubuntu 22.04
Install phpMyAdmin using the following command:
sudo apt install phpmyadmin
During the installation, you’ll be prompted to configure phpMyAdmin. Here’s how to configure it:
- Choose the web server you’re using. If you’re using Apache, select it by pressing the spacebar and then press Enter.
- Select “Yes” when asked if you want to configure the database for phpMyAdmin with dbconfig-common.
- Enter the MySQL root password you set earlier when prompted.
- Set a password for the phpMyAdmin application itself.
Step 3 – Configure PHPMyAdmin
Once phpMyAdmin is installed, it needs to be configured properly.
Execute the following command on command prompt to configure phpmyadmin for Apache:
sudo nano /etc/apache2/conf-available/phpmyadmin.conf
After that, add the following line into apache2.conf file and save it:
Alias /phpmyadmin /var/www/html/phpmyadmin

Options Indexes FollowSymLinks
DirectoryIndex index.php


AddType application/x-httpd-php .php

php_flag magic_quotes_gpc Off
php_flag track_vars On
php_flag register_globals Off
php_value include_path .


# Authorize for setup


AuthType Basic
AuthName "phpMyAdmin Setup"
AuthUserFile /etc/phpmyadmin/htpasswd.setup

Require valid-user


# Disallow web access to directories that don't need it

Order Deny,Allow
Deny from All


Order Deny,Allow
Deny from All
Using the following command to enable the configuration:
sudo a2enconf phpmyadmin.conf
Step 4 – Restart Apache 2 Server
After enabling the configuration, restart the Apache web server to apply the changes:
sudo service apache2 restart
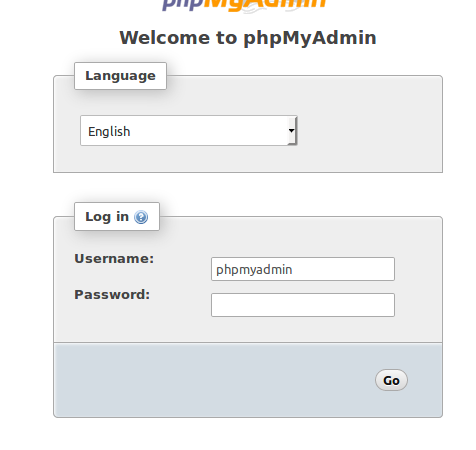
Step 5 – Access phpMyAdmin
Open your browser and type the below url with server ip:
http://[SERVER_PUBLIC_IP]/phpmyadmin
Then you will look like on your browser:
Step 6 – Secure phpMyAdmin Optional
To enhance the security of your phpMyAdmin installation, you can perform additional configurations such as changing the phpmyadmin access URL, setting up authentication, and configuring HTTPS. Be sure to follow best practices for securing your server.
Conclusion
Through this tutorial, we have learned how to install and configure phpmyadmin on ubuntu 22.04 server.