When working with WordPress, you may face situations where you need to upload files that exceed the default maximum file upload size in wordpress. Fortunately, there are several methods to increase this limit.
In this tutorial guide, you will explore various methods to increase max/maximum file upload size in WordPress using cPanel, wp-config.php, .htaccess, and plugins.
How to Increase Maximum File Upload Size in WordPress Cpanel, Wp-config, htaccess, plugin
By using any of the methods described below, you can increase the max/maximum file upload size in WordPress using cPanel, modifying wp-config.php or .htaccess files, or relying on plugins, php.ini and function:
- Using a WordPress Plugins
- Increasing Maximum File Upload Size in WordPress php.ini
- Increasing Maximum File Upload Size in the wp-config.php File
- Increasing Maximum File Upload Size via .htaccess
- Edit functions.php File
- Contact Your Hosting Provider
- Change Max Upload size WordPress Cpanel
#1 Using WordPress Plugins
If you are a non-coder & afraid of editing hosting files.
I suggest you use WordPress Plugins to solve the “The uploaded file exceeds the upload_max_filesize” problem effortlessly.
- Log in to your Wp-admin dashboard.
- Visit “Plugins” -> “Add New” and search for a plugin called “Increase Maximum Upload File Size” or similar.
- Install and activate the plugin.
- Once your plugin is activated, visit the plugin’s settings page (usually found under “Settings” or “Media” in the WordPress admin menu).
- Adjust the maximum file upload size settings to your desired value (e.g., 64MB).
- Save the changes.
- Clear your browser cache.
- Go to “Media” -> “Add New” and check if the maximum file upload size has increased.
Plugins to Solve The uploaded file exceeds the upload_max_filesize
#2 Increasing Maximum File Upload Size in WordPress php.ini
Most of the cPanel use PHP coding to develop the hosting management system. You will find a file named php.ini which will help you to upload large files to your website.
You need to add below lines by editing your php.ini file.
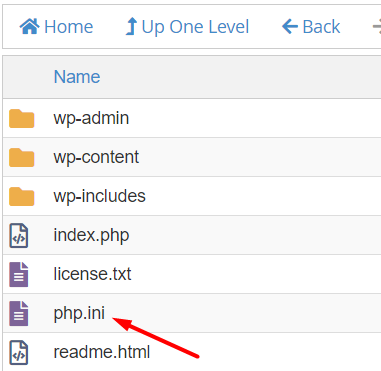
Figure 1
upload_max_filesize = 25M
post_max_size = 13M
memory_limit = 15M
You will find the php.ini file on your hosting under the WordPress installation directory ( Check Figure 1 ). Open the file in the Text Editor & add the lines from the above box.
In case you don’t find the ini.php file on your WordPress Directory, you can create one, add the codes & upload it to WP Installation Directory.
Create New php.ini File
Once you update the file, try to reupload your file on WordPress. If you still get the error notice, move forwar & try the method.
#3 Increasing Maximum File Upload Size in the wp-config.php File
Wp-config.php is a core WordPress file that contains some important information and instructions for your website. Here you can easily define the upload limit on your website. You will find the wp-config.php file on the same directory where php.ini is located.
Open the file on Text Editor & add below lines at the bottom of your wp-config.php file.
@ini_set( 'upload_max_size' , '24M' );
@ini_set( 'post_max_size', '13M');
@ini_set( 'memory_limit', '15M' );
or you can add below line instead of above one.
define('WP_MEMORY_LIMIT', '256M');
Save the file & try to upload files on your WordPress site again. Hope this will solve the issue. Or you can try next method.
#4 Increasing Maximum File Upload Size via .htaccess
To edit the .htaccess file you will need to navigate to the WordPress installation directory again and make sure all your server hidden files are visible. You can do this by simply clicking on the Settings icon on the top right corner and checking the option “Show hidden files”.
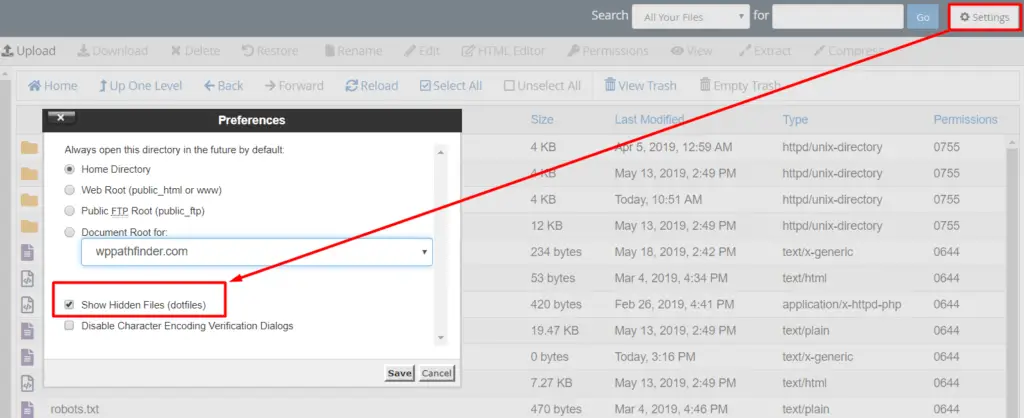
Once you save the option, you will find all the hidden files visible including the .htaccess file. So, you need to edit the file using Text Editor & add following lines from below box.
php_value upload_max_filesize 64M
php_value post_max_size 128M
php_value memory_limit 256M
php_value max_execution_time 300
php_value max_input_time 300
You can modify the sizes in Megabytes. Suppose you can change 64M to 128M depending on your requirement. Also, you can increase the execution time & input time to avoid errors for time delay on large file uploads.
#5 Edit functions.php File
If you are not too much Tech Expert, I suggest you not to edit WordPress core files like wp-config.php & .htaccess file.
Rather, it will be clever way to update your WordPress theme files. Because, you can easily change your theme & restore any damage using the theme backup.
Because, you always have theme backup & it’s less harmful for your website. You can easily recover your website if anything bad happen!
So, I suggest you to navigate the WordPress Theme installation folder & edit the theme function file.
you will find it inside the theme folder. Just select the right theme that is currently active & you will notice the file “functions.php”.
Your next step is open the file in a Text Editor & add below lines on function file on your theme.
The actual path is “wp-content>themes>ActiveTheme>functions.php“.
Once you find the file, edit it & add below lines on it.
@ini_set( 'upload_max_size' , '64M' );
@ini_set( 'post_max_size', '64M');
@ini_set( 'max_execution_time', '300' );
Your problem should be solved at this stage. But if you don’t get the solution, you should try the next way.
#6 Contact Your Hosting Provider
If you are not much expert to solve the problem by applying the above methods, then you have two options available!
- Contact Hosting Support Center
- Hire an Expert
#7 Change Max Upload size WordPress Cpanel
- a. Access your hosting cPanel and locate the “Select PHP Version” or “MultiPHP Manager” option.
- b. Choose a newer PHP version (if available) to ensure compatibility and improved performance.
- c. Select the “Options” or “Switch to PHP Options” button.
- d. Look for the “upload_max_filesize” and “post_max_size” settings and modify their values accordingly.
- e. Save the changes and exit the cPanel.
Conclusion
By applying any of the methods described above, you can successfully increase the maximum file upload size in WordPress. Whether you prefer using cPanel, modifying wp-config.php or .htaccess files, or relying on plugins, these techniques provide you with the flexibility to meet your specific requirements. Ensure that you exercise caution when making changes to important files and always keep backups to avoid any potential issues.