Imagick is a popular PHP extension and library used for image processing and manipulation, including converting PDF files to images. It provides a high-level API for working with images and is commonly used for various image-related tasks in PHP applications.
When it comes to converting PDF files to images, Imagick offers the ability to extract individual pages from a PDF document and convert them into different image formats like JPEG, PNG, GIF, and others.
To convert pdf to image in laravel. In this tutorial, you will learn how to convert pdf to image in Laravel 10 app using Imagick package.
Laravel 10 Convert PDF to Image Example Tutorial
Steps to convert pdf to image in Laravel 10 app:
- Step 1: Install Laravel 10 App
- Step 2: Installing Imagick PHP Extension And Configuration
- Step 3: Add Route
- Step 4: Create Controller
- Step 5: Create a Blade View
- Step 6: Test the PDF to Image Conversion
Step 1: Install Laravel 10 App
First of all, start your terminal to download or install Laravel 10 new setup. Run the following commands in it to install the new Laravel 10 app on your system:
composer create-project --prefer-dist laravel/laravel blog
Step 2: Installing Imagick PHP Extension And Configuration
Now, execute the following command on terminal to install Imagick PHP extension is available from the Ubuntu’s repositories:
sudo apt install php-imagick
Use the following command to check the list the version available from the Ubuntu repositories using the apt list command.
sudo apt list php-magick -a
The -a flag tells apt to list all version of a package available from the repositories. The output will look similar to the following, and at the time of this writing, there was only a single version available.
php-imagick/bionic,now 3.4.3~rc2-2ubuntu4 amd64 [installed]
restart apache web server
Then, restart Apache web server:
sudo systemctl restart apache2
Verify Installation
Execute the following command to verify the installation:
php -m | grep imagick
If the installation was successful, the output of the command will simply show one line, and it will only contain the name of the module imagick.
imagick
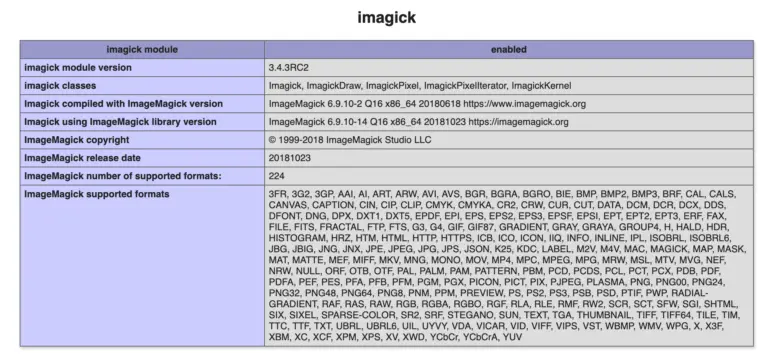
For a much more detailed verification of whether the PHP module was installed correctly, use the phpinfo() method.
On the command line, execute the following command
php -r 'phpinfo();' | grep imagick
Which will output the following information, where the modules status is shown as enabled.
/etc/php/7.3/cli/conf.d/20-imagick.ini,
imagick
imagick module => enabled
imagick module version => 3.4.4
imagick classes => Imagick, ImagickDraw, ImagickPixel, ImagickPixelIterator, ImagickKernel
imagick.locale_fix => 0 => 0
imagick.progress_monitor => 0 => 0
imagick.set_single_thread => 1 => 1
imagick.shutdown_sleep_count => 10 => 10
imagick.skip_version_check => 1 => 1
Alternatively, by adding the phpinfo() function to a php script, and then accessing the script from a web browser. Now, you are able to see the module is installed and enabled.

After some authorization change in fowling the path
/etc/ImageMagick-6/policy.xml
< policy domain="coder" rights="none" pattern="PDF" / >
To Convert
< policy domain="coder" rights="read|write" pattern="PDF" / >
Step 3: Define Routes
In your routes/web.php file, define a route to the convertToImage method in the PdfToImageController:
use Illuminate\Support\Facades\Route;
use App\Http\Controllers\PdfToImageController;

Route::get('/', function () {
    return view('pdf_to_image');
});

Route::post('/convert-to-image', [PdfToImageController::class, 'convertToImage'])->name('convertToImage');
Step 4: Create Controller
Next, create a controller to handle the PDF to image conversion.
Generate a new controller using the following Artisan command:
php artisan make:controller PdfToImageController
Now, open the newly created PdfToImageController.php in the app/Http/Controllers directory and add the following code:
<?php
namespace App\Http\Controllers;
use Illuminate\Http\Request;
use Imagick;
class PdfToImageController extends Controller
{
public function convertToImage(Request $request)
{
// Validate the request
$request->validate([
‘pdf_file’ => ‘required|file|mimes:pdf’,
]);
    // Get the PDF file
    $pdfFile = $request->file('pdf_file');

    // Create an Imagick object
    $imagick = new Imagick();

    // Read the PDF file
    $imagick->readImage($pdfFile->getRealPath());

    // Convert PDF pages to images
    $imagick->setImageFormat('jpeg');

    // Save each page as an image
    foreach ($imagick as $pageNumber => $page) {
        $page->writeImage(public_path("pdf_images/page_{$pageNumber}.jpg"));
    }

    // Clear Imagick resources
    $imagick->clear();
    $imagick->destroy();

    return "PDF pages converted to images successfully!";
}
}
In this controller, we first validate that the uploaded file is a PDF. Then, we use the Imagick library to convert each page of the PDF into a JPEG image and save it in the public/pdf_images directory. Finally, we return a success message.
Step 5: Create a Blade View
Now, create a Blade view that includes a form to upload a PDF file. In the resources/views directory, create a new Blade view file, such as pdf_to_image.blade.php, and add the following code:
<!DOCTYPE html>
<html>
<head>
    <title>PDF to Image Conversion</title>
</head>
<body>
    <h1>Convert PDF to Images</h1>
    <form action="{{ route('convertToImage') }}" method="POST" enctype="multipart/form-data">
        @csrf
        <input type="file" name="pdf_file">
        <button type="submit">Convert</button>
    </form>
</body>
</html>
Step 6: Test the PDF to Image Conversion
Now, open your terminal and execute the following command on it to start development server:
php artisan serve
You can now run your Laravel application and access it in your browser. Visit the URL where you defined the route for the PDF to image conversion (e.g., http://localhost:8000/pdf_to_image) and upload a PDF file.
http://localhost:8000/pdf_to_image
