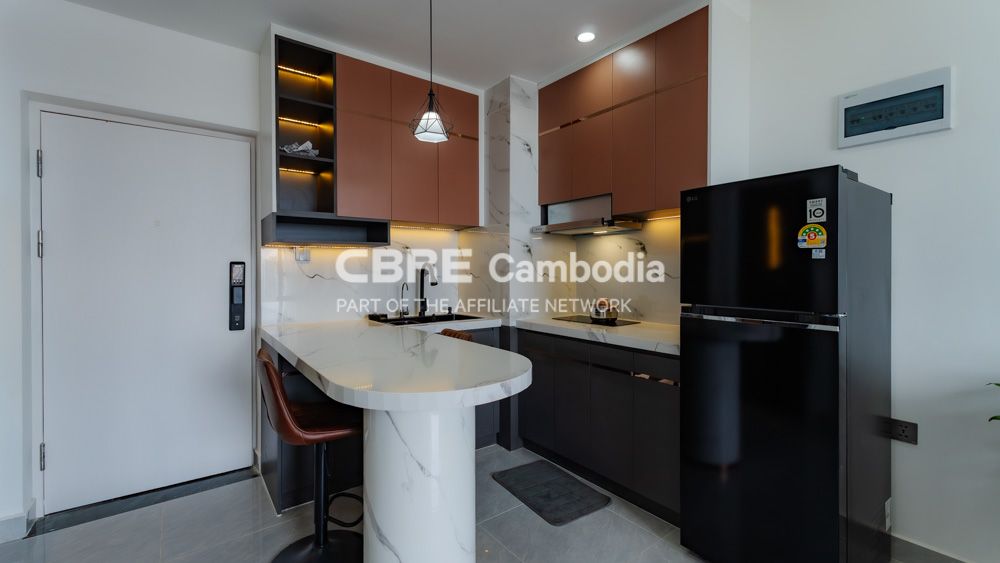
Login and registration app using node js and MySQL DB. In this tutorial, you will learn how to create user registration and login authentication system application using node js express js with MySQL.
As well as you will learn from this creating registration and login form in node.js and mysql tutorial:
- How to connect to a MySQL database and selecting rows using MySQL queries in node js app.
- Building GET and POST requests with Node express js apps.
- Sending and receiving data from the client using Node and Express.
- How to handle session in node express js apps.
- How to determine if a user is logged in or not by session.
- How to parse form data in node js apps.
This tutorial will help you step by step to create a registration and login application system in node js with MySQL database.
Login and Registration Form in Node js express and MySQL
Follow the following steps to creating registration and login form in node.js express and mysql:
- Step 1: Install Node Express JS Setup
- Step 2: Connect Node Express Js App with DB
- Step 3: Import Packages and routes in app.js
- Step 4: Create Route
- Step 5: Create Login & Registration Views
- Step 6: Run Development Server
Step 1: Install Node Express JS Setup
The following command install express js setup:
express --view=ejs myApp
After open myApp setup with any text editor. And use the following command to enter your myApp app directories, So open your cmd and run the following command:
cd loginSystem
Your node express js app structure looks like:
Next, you need to install some required pacakges, so open again your cmd and run the following commands:
npm install npm install express-flash --save npm install express-session --save npm install express-validator --save npm install method-override --save npm install mysql --save
Flash is an extension of connect-flash with the ability to define a flash message and render it without redirecting the request.
In this node js mysql crud tutorial express flash is used to display a warning, error and information message
Express-session is used to made a session as like in PHP. In this node js mysql crud tutorial, session is needed as the express requirement of express-flash.
Express validator is used to validate form data it is easy to use. express-validator highly effective and efficient way to accelerate the creation of applications.
NPM is used to run a DELETE and PUT method from an HTML form. In several web browsers only support GET and POST methods.
Driver to connect node.js with MySQL
Step 2: Connect Node js Express with DB
Before connecting DB to your application, create table into your database by using the following SQL query:
CREATE DATABASE IF NOT EXISTS `myapp` DEFAULT CHARACTER SET utf8 COLLATE utf8_general_ci; USE `nodelogin`; CREATE TABLE IF NOT EXISTS `users` ( `id` int(11) NOT NULL, `name` varchar(50) NOT NULL, `password` varchar(255) NOT NULL, `email` varchar(100) NOT NULL ) ENGINE=InnoDB AUTO_INCREMENT=2 DEFAULT CHARSET=utf8; INSERT INTO `users` (`id`, `name`, `password`, `email`) VALUES (1, 'test', 'test', '[email protected]'); ALTER TABLE `users` ADD PRIMARY KEY (`id`); ALTER TABLE `users` MODIFY `id` int(11) NOT NULL AUTO_INCREMENT,AUTO_INCREMENT=2;
Next, you need to create one folder named lib and create a new file name db.js inside lib folder.
Note that, This file is used to connect your node express js app to MySQL db.
lib/db.js
Update the MySQL connection code into your db.js file:
var mysql=require('mysql'); var connection=mysql.createConnection({ host:'localhost', user:'root', password:'your password', database:'myapp' }); connection.connect(function(error){ if(!!error){ console.log(error); }else{ console.log('Connected!:)'); } }); module.exports = connection;
Step 3: Import Packages and routes in app.js
In this step, you need to include all packages in app.js file whose installed above and also initialize the session in this file.
So go to app.js file and update the following code:
var createError = require('http-errors'); var express = require('express'); var path = require('path'); var cookieParser = require('cookie-parser'); var logger = require('morgan'); var expressValidator = require('express-validator'); var flash = require('express-flash'); var session = require('express-session'); var bodyParser = require('body-parser'); var mysql = require('mysql'); var connection = require('./lib/db'); var authRouter = require('./routes/auth'); var app = express(); // view engine setup app.set('views', path.join(__dirname, 'views')); app.set('view engine', 'ejs'); app.use(logger('dev')); app.use(bodyParser.json()); app.use(bodyParser.urlencoded({ extended: true })); app.use(cookieParser()); app.use(express.static(path.join(__dirname, 'public'))); app.use(session({ secret: '123456cat', resave: false, saveUninitialized: true, cookie: { maxAge: 60000 } })) app.use(flash()); app.use(expressValidator()); app.use('/auth', authRouter); // catch 404 and forward to error handler app.use(function(req, res, next) { next(createError(404)); }); // error handler app.use(function(err, req, res, next) { // set locals, only providing error in development res.locals.message = err.message; res.locals.error = req.app.get('env') === 'development' ? err : {}; // render the error page res.status(err.status || 500); res.render('error'); }); // port must be set to 3000 because incoming http requests are routed from port 80 to port 8080 app.listen(3000, function () { console.log('Node app is running on port 3000'); }); module.exports = app;
Step 4: Create Route
In this step, you need to create one route file name auth.js inside the routes folder.
Then update the following routes into your routes/auth.js file:
var express = require('express'); var router = express.Router(); var connection = require('../lib/db'); //display login page router.get('/', function(req, res, next){ res.render('auth/login', { title: 'Login', email: '', password: '' }) }) //display login page router.get('/login', function(req, res, next){ res.render('auth/login', { title: 'Login', email: '', password: '' }) }) //authenticate user router.post('/authentication', function(req, res, next) { var email = req.body.email; var password = req.body.password; connection.query('SELECT * FROM accounts WHERE email = ? AND password = ?', [email, password], function(err, rows, fields) { if(err) throw err // if user not found if (rows.length <= 0) { req.flash('error', 'Please correct enter email and Password!') res.redirect('/login') } else { // if user found // render to views/user/edit.ejs template file req.session.loggedin = true; req.session.name = name; res.redirect('/home'); } }) }) //display login page router.get('/register', function(req, res, next){ res.render('auth/register', { title: 'Registration Page', name: '', email: '', password: '' }) }) // user registration router.post('/post-register', function(req, res, next){ req.assert('name', 'Name is required').notEmpty() //Validate name req.assert('password', 'Password is required').notEmpty() //Validate password req.assert('email', 'A valid email is required').isEmail() //Validate email var errors = req.validationErrors() if( !errors ) { //No errors were found. Passed Validation! var user = { name: req.sanitize('name').escape().trim(), email: req.sanitize('email').escape().trim(), password: req.sanitize('password').escape().trim() } connection.query('INSERT INTO users SET ?', user, function(err, result) { //if(err) throw err if (err) { req.flash('error', err) res.render('auth/register', { title: 'Registration Page', name: '', password: '', email: '' }) } else { req.flash('success', 'You have successfully signup!'); res.redirect('/login'); } }) } else { //Display errors to user var error_msg = '' errors.forEach(function(error) { error_msg += error.msg + '<br>' }) req.flash('error', error_msg) /** * Using req.body.name * because req.param('name') is deprecated */ res.render('auth/register', { title: 'Registration Page', name: req.body.name, email: req.body.email, password: '' }) } }) //display home page router.get('/home', function(req, res, next) { if (req.session.loggedin) { res.render('auth/home', { title:"Dashboard", name: req.session.name, }); } else { req.flash('success', 'Please login first!'); res.redirect('/login'); } }); // Logout user router.get('/logout', function (req, res) { req.session.destroy(); req.flash('success', 'Login Again Here'); res.redirect('/login'); }); module.exports = router;
Step 5: Create Login and Registration Views
In this step, you need to create one folder name Auth. So go to the views folder in your app and create the Auth folder.
Inside the Auth folder, you need to create two views file. The views file is the following:
- login.ejs
- register.ejs
- home.ejs
Now, open your login.ejs file and update the following code into your file:
<!DOCTYPE html> <html> <head> <title><%= title %></title> <script src="https://code.jquery.com/jquery-3.4.1.min.js"></script> <script src="https://cdnjs.cloudflare.com/ajax/libs/popper.js/1.14.3/umd/popper.min.js"></script> <script src="https://stackpath.bootstrapcdn.com/bootstrap/4.1.3/js/bootstrap.min.js"></script> <link rel="stylesheet" href="https://stackpath.bootstrapcdn.com/bootstrap/4.1.3/css/bootstrap.min.css"> </head> <body> <% if (messages.error) { %> <p style="color:red"><%- messages.error %></p> <% } %> <% if (messages.success) { %> <p style="color:green"><%- messages.success %></p> <% } %> <form action="/auth/authentication" method="post" name="form1"> <div class="form-group"> <label for="exampleInputEmail1">Email</label> <input type="email" name="email" class="form-control" id="email" aria-describedby="emailHelp" placeholder="Enter email" value=""> </div> <div class="form-group"> <label for="exampleInputEmail1">Password</label> <input type="password" name="password" class="form-control" id="password" aria-describedby="emailHelp" placeholder="*********" value=""> </div> <input type="submit" class="btn btn-primary" value="Add"> <a href="auth/register" class="btn btn-success ml-2">Register Here</a> </form> </body> </html>
Now, open your register.ejs file and update the following code into your file:
<!DOCTYPE html> <html> <head> <title><%= title %></title> <script src="https://code.jquery.com/jquery-3.4.1.min.js"></script> <script src="https://cdnjs.cloudflare.com/ajax/libs/popper.js/1.14.3/umd/popper.min.js"></script> <script src="https://stackpath.bootstrapcdn.com/bootstrap/4.1.3/js/bootstrap.min.js"></script> <link rel="stylesheet" href="https://stackpath.bootstrapcdn.com/bootstrap/4.1.3/css/bootstrap.min.css"> </head> <body> <% if (messages.error) { %> <p style="color:red"><%- messages.error %></p> <% } %> <% if (messages.success) { %> <p style="color:green"><%- messages.success %></p> <% } %> <form action="/auth/post-register" method="post" name="form1"> <div class="form-group"> <label for="exampleInputEmail1">Name</label> <input type="name" name="name" class="form-control" id="name" aria-describedby="nameHelp" placeholder="Enter name" value=""> </div> <div class="form-group"> <label for="exampleInputEmail1">Email</label> <input type="email" name="email" class="form-control" id="email" aria-describedby="emailHelp" placeholder="Enter email" value=""> </div> <div class="form-group"> <label for="exampleInputEmail1">Password</label> <input type="password" name="password" class="form-control" id="password" aria-describedby="emailHelp" placeholder="*********" value=""> </div> <input type="submit" class="btn btn-primary" value="Add"> <a href="auth/login" class="btn btn-success ml-2">Login</a> </form> </body> </html>
This login.ejs file contains login form.
Next, open your home.ejs file and update the following code into your file:
<!DOCTYPE html> <html> <head> <title><%= title %></title> <script src="https://code.jquery.com/jquery-3.4.1.min.js"></script> <script src="https://cdnjs.cloudflare.com/ajax/libs/popper.js/1.14.3/umd/popper.min.js"></script> <script src="https://stackpath.bootstrapcdn.com/bootstrap/4.1.3/js/bootstrap.min.js"></script> <link rel="stylesheet" href="https://stackpath.bootstrapcdn.com/bootstrap/4.1.3/css/bootstrap.min.css"> </head> <body> <div class="container"> <% if (messages.error) { %> <p style="color:red"><%- messages.error %></p> <% } %> <% if (messages.success) { %> <p style="color:green"><%- messages.success %></p> <% } %> <div class="card"> <div class="card-header"> Dashboard <b><%= name %></b> </div> <div class="card-body"> <h5 class="card-title">Welcome</h5> <p class="card-text">You have successfully login</p> <a href="auth/logout" class="btn btn-primary">Logout</a> </div> </div> </div> </body> </html>
Step 6: Run Development Server
You can use the following command to run development server:
//run the below command npm start after run this command open your browser and hit http://127.0.0.1:3000/auth OR http://127.0.0.1:3000/auth/login
Conclusion
In this node express js login example with MySQL tutorial. You have learned how to create login system in node js using express js framework with MySQL db.
Thanks for one more wonderful informative post, I’m a regular reader of your blog Because You provide valuable data. I genuinely appreciate all of the hard function you put into this wonderful blog.