Laravel 9 multiple user role based authentication example; In this tutorial, you will learn how to create multi user role based auth system in laravel 9 apps.
Note that, Multiple user auth system means multiple users can log in one application according to roles. Multiple authentications are very important in the large application of laravel. Authentication is the process of recognizing user credentials.
How to Create Multiple User Authentication in Laravel 9 App
Follow the following steps to create multiple user role based authentication system in laravel 9 apps; is as follows:
- Step 1: Install Laravel 9 App
- Step 2: Connecting App to Database
- Step 3: Setting up migration and model
- Step 4: Create Middleware and Setting up
- Step 5: Define Route
- Step 6: Create Methods in Controller
- Step 7: Create Blade View
- Step 8: Update LoginController
- Step 9: Create Seeder
- Step 10: Start Development Server
Step 1: Install Laravel 9 App
Open the terminal and execute the below command to download the laravel fresh setup on your system:
composer create-project --prefer-dist laravel/laravel LaraMulti
Step 2: Connecting App to Database
After successfully download laravel Application, Go to your project .env file and set up database credential:
  DB_CONNECTION=mysql
  DB_HOST=127.0.0.1
  DB_PORT=3306
  DB_DATABASE=here your database name here
  DB_USERNAME=here database username here
  DB_PASSWORD=here database password here
Step 3: Setting up migration and model
Next, add is_admin column in the users table using mirgration file. So, Open the creates_users_table.php migration file, which is placed on Database/migration and update the following field for admin.
<?php

use Illuminate\Database\Migrations\Migration;
use Illuminate\Database\Schema\Blueprint;
use Illuminate\Support\Facades\Schema;

return new class extends Migration
{
    /**
     * Run the migrations.
     *
     * @return void
     */
    public function up()
    {
        Schema::create('users', function (Blueprint $table) {
            $table->id();
            $table->string('name');
            $table->string('email')->unique();
            $table->timestamp('email_verified_at')->nullable();
            $table->string('password');
            $table->tinyInteger('type')->default(0);
            /* Users: 0=>User, 1=>Admin, 2=>Manager */
            $table->rememberToken();
            $table->timestamps();
        });
    }

    /**
     * Reverse the migrations.
     *
     * @return void
     */
    public function down()
    {
        Schema::dropIfExists('users');
    }
};
Next open app/User.php and update the below field name is_admin here:
<?php

namespace App\Models;

use Illuminate\Contracts\Auth\MustVerifyEmail;
use Illuminate\Database\Eloquent\Factories\HasFactory;
use Illuminate\Foundation\Auth\User as Authenticatable;
use Illuminate\Notifications\Notifiable;
use Laravel\Sanctum\HasApiTokens;
use Illuminate\Database\Eloquent\Casts\Attribute;

class User extends Authenticatable
{
    use HasApiTokens, HasFactory, Notifiable;

    /**
     * The attributes that are mass assignable.
     *
     * @var array

     */
    protected $fillable = [
        'name',
        'email',
        'password',
        'type'
    ];

    /**
     * The attributes that should be hidden for serialization.
     *
     * @var array

     */
    protected $hidden = [
        'password',
        'remember_token',
    ];

    /**
     * The attributes that should be cast.
     *
     * @var array

     */
    protected $casts = [
        'email_verified_at' => 'datetime',
    ];

    /**
     * Interact with the user's first name.
     *
     * @param  string  $value
     * @return \Illuminate\Database\Eloquent\Casts\Attribute
     */
    protected function type(): Attribute
    {
        return new Attribute(
            get: fn ($value) =>  ["user", "admin", "manager"][$value],
        );
    }
}
Now, add is_admin filed after that will use the below command for creating this field into the database.
php artisan migrate
Now, create a build-in authentication system. Use the below command for creating the default auth system in laravel. And change laravel build-in auth system to multi auth system
This command will create routes, controllers and views files for Laravel Login Authentication and registration. It means to provide a basic laravel login authentication and registration Complete system. Let’s open the command prompt and type the below command.
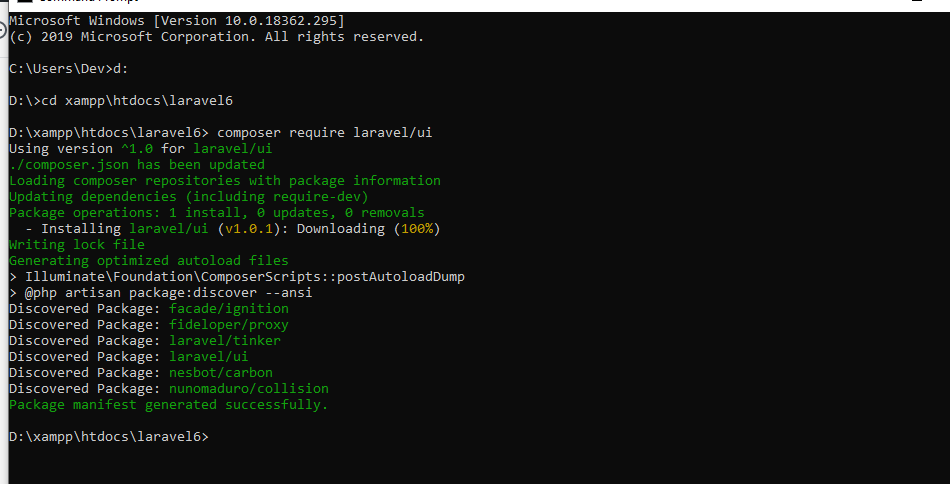
Then install laravel 9 UI in your project using the below command:
composer require laravel/ui

Now, execute the below command on terminal for creating login, registration, forget password and reset password blade files:
php artisan ui bootstrap --auth
Then execute the following commands:
npm install
npm run dev
Step 4: Create Middleware and Setting up
To create a middleware for checking the users. Who can access the admin area or who can access the normal user area.
php artisan make:middleware UserAccess
After creating a middleware go-to app/Http/middleware. Implement the logic here for checking a logged in users. Update the code in this handle function.
<?php

namespace App\Http\Middleware;

use Closure;
use Illuminate\Http\Request;

class UserAccess
{
    /**
     * Handle an incoming request.
     *
     * @param  \Illuminate\Http\Request  $request
     * @param  \Closure(\Illuminate\Http\Request): (\Illuminate\Http\Response|\Illuminate\Http\RedirectResponse)  $next
     * @return \Illuminate\Http\Response|\Illuminate\Http\RedirectResponse
     */
    public function handle(Request $request, Closure $next, $userType)
    {
        if(auth()->user()->type == $userType){
            return $next($request);
        }

        return response()->json(['You do not have permission to access for this page.']);
        /* return response()->view('errors.check-permission'); */
    }
}
Then register this middleware in the app/Http/Kernel.php. So, open kernal.php and add the following $routeMiddleware property in it:
....
protected $routeMiddleware = [
    'auth' => \App\Http\Middleware\Authenticate::class,
    'auth.basic' => \Illuminate\Auth\Middleware\AuthenticateWithBasicAuth::class,
    'bindings' => \Illuminate\Routing\Middleware\SubstituteBindings::class,
    'cache.headers' => \Illuminate\Http\Middleware\SetCacheHeaders::class,
    'can' => \Illuminate\Auth\Middleware\Authorize::class,
    'guest' => \App\Http\Middleware\RedirectIfAuthenticated::class,
    'signed' => \Illuminate\Routing\Middleware\ValidateSignature::class,
    'throttle' => \Illuminate\Routing\Middleware\ThrottleRequests::class,
    'verified' => \Illuminate\Auth\Middleware\EnsureEmailIsVerified::class,
    'user-access' => \App\Http\Middleware\UserAccess::class,
];
....
Step 5: Define Route
Create routes and add it on web.php file as like below.
Open routes/web.php file
<?php

use Illuminate\Support\Facades\Route;

use App\Http\Controllers\HomeController;

/*
|--------------------------------------------------------------------------
| Web Routes
|--------------------------------------------------------------------------
|
| Here is where you can register web routes for your application. These
| routes are loaded by the RouteServiceProvider within a group which
| contains the "web" middleware group. Now create something great!
|
*/

Route::get('/', function () {
    return view('welcome');
});

Auth::routes();

/*------------------------------------------
--------------------------------------------
All Normal Users Routes List
--------------------------------------------
--------------------------------------------*/
Route::middleware(['auth', 'user-access:user'])->group(function () {

    Route::get('/home', [HomeController::class, 'index'])->name('home');
});

/*------------------------------------------
--------------------------------------------
All Admin Routes List
--------------------------------------------
--------------------------------------------*/
Route::middleware(['auth', 'user-access:admin'])->group(function () {

    Route::get('/admin/home', [HomeController::class, 'adminHome'])->name('admin.home');
});

/*------------------------------------------
--------------------------------------------
All Admin Routes List
--------------------------------------------
--------------------------------------------*/
Route::middleware(['auth', 'user-access:manager'])->group(function () {

    Route::get('/manager/home', [HomeController::class, 'managerHome'])->name('manager.home');
})
Step 6: Create Methods in Controller
Now open the HomeController.php file, which is placed on app/Http/Controllers/ directory. Then add the following code into it:
<?php

namespace App\Http\Controllers;

use Illuminate\Http\Request;

class HomeController extends Controller
{
    /**
     * Create a new controller instance.
     *
     * @return void
     */
    public function __construct()
    {
        $this->middleware('auth');
    }

    /**
     * Show the application dashboard.
     *
     * @return \Illuminate\Contracts\Support\Renderable
     */
    public function index()
    {
        return view('home');
    }

    /**
     * Show the application dashboard.
     *
     * @return \Illuminate\Contracts\Support\Renderable
     */
    public function adminHome()
    {
        return view('adminHome');
    }

    /**
     * Show the application dashboard.
     *
     * @return \Illuminate\Contracts\Support\Renderable
     */
    public function managerHome()
    {
        return view('managerHome');
    }
}
Step 7: Create Blade View
Now, create two blade view files first is display home page and second is display after login.
Open the resources/views/home.blade. file and update the below code.
@extends('layouts.app')

@section('content')
<div class="container">
    <div class="row justify-content-center">
        <div class="col-md-8">
            <div class="card">
                <div class="card-header">Dashboard</div>

                <div class="card-body">
                    @if(auth()->user()->is_admin == 1)
                    <a href="{{url('admin/routes')}}">Admin</a>
                    @else
                    <div class=”panel-heading”>Normal User</div>
                    @endif
                </div>
            </div>
        </div>
    </div>
</div>
@endsection
Now, I checked the user profile. If it is admin, it will navigate to the admin area. Otherwise, it will redirect to users area.
Create adminHome.blade.php file inside resources/views/ directory and update the following code:
@extends('layouts.app')

@section('content')
<div class="container">
    <div class="row justify-content-center">
        <div class="col-md-8">
            <div class="card">
                <div class="card-header">{{ __('Dashboard') }}</div>

                <div class="card-body">
                    You are a Admin User.
                </div>
            </div>
        </div>
    </div>
</div>
@endsection
Create managerHome.blade.php file inside resources/views/ directory and update the following code:
@extends('layouts.app')
@section('content')
<div class="container">
    <div class="row justify-content-center">
        <div class="col-md-8">
            <div class="card">
                <div class="card-header">{{ __('Dashboard') }}</div>

                <div class="card-body">
                    You are a Manager User.
                </div>
            </div>
        </div>
    </div>
</div>
@endsection
Step 8: Update on LoginController
Update methods in loginController, so go to app/Http/Controllers/Auth/ and open loginController.php file and add the following code into it:
<?php

namespace App\Http\Controllers\Auth;

use App\Http\Controllers\Controller;
use App\Providers\RouteServiceProvider;
use Illuminate\Foundation\Auth\AuthenticatesUsers;
use Illuminate\Http\Request;

class LoginController extends Controller
{
    /*
    |--------------------------------------------------------------------------
    | Login Controller
    |--------------------------------------------------------------------------
    |
    | This controller handles authenticating users for the application and
    | redirecting them to your home screen. The controller uses a trait
    | to conveniently provide its functionality to your applications.
    |
    */

    use AuthenticatesUsers;

    /**
     * Where to redirect users after login.
     *
     * @var string
     */
    protected $redirectTo = RouteServiceProvider::HOME;

    /**
     * Create a new controller instance.
     *
     * @return void
     */
    public function __construct()
    {
        $this->middleware('guest')->except('logout');
    }

    public function login(Request $request)
    {
        $input = $request->all();

        $this->validate($request, [
            'email' => 'required|email',
            'password' => 'required',
        ]);

        if(auth()->attempt(array('email' => $input['email'], 'password' => $input['password'])))
        {
            if (auth()->user()->type == 'admin') {
                return redirect()->route('admin.home');
            }else if (auth()->user()->type == 'manager') {
                return redirect()->route('manager.home');
            }else{
                return redirect()->route('home');
            }
        }else{
            return redirect()->route('login')
                ->with('error','Email-Address And Password Are Wrong.');
        }

    }
}
Step 9: Create Seeder
Run the following command on terminal to create seeders; is as follows:
php artisan make:seeder CreateUsersSeeder
Then visit to database/seeders/ directory and open CreateUsersSeeder.php. And add the following code into it:
<?php

namespace Database\Seeders;

use Illuminate\Database\Console\Seeds\WithoutModelEvents;
use Illuminate\Database\Seeder;
use App\Models\User;

class CreateUsersSeeder extends Seeder
{
    /**
     * Run the database seeds.
     *
     * @return void
     */
    public function run()
    {
        $users = [
            [
               'name'=>'Admin User',
               'email'=>'[email protected]',
               'type'=>1,
               'password'=> bcrypt('123456'),
            ],
            [
               'name'=>'Manager User',
               'email'=>'[email protected]',
               'type'=> 2,
               'password'=> bcrypt('123456'),
            ],
            [
               'name'=>'User',
               'email'=>'[email protected]',
               'type'=>0,
               'password'=> bcrypt('123456'),
            ],
        ];

        foreach ($users as $key => $user) {
            User::create($user);
        }
    }
}
Execute the following command on terminal to seed from seeders; is as follows:
php artisan db:seed --class=CreateUsersSeeder
Step 10: Run development server
Now, start the development server using the below command and test our laravel multi user role based auth system:
php artisan serve
